On WordPress you can add media files to your website such as images, PDFs and more.
Once the file has been added, you can then use it on the front-end of your site.
Step 1 : Finding where to add media Files in your dashboard
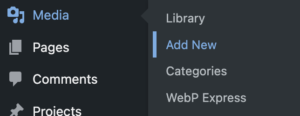
Once logged in, a menu displays down the left-hand side of the dashboard, select Media > Add New.

Step 2 : Understanding file parameters
There are a few file parameters you will need to understand before uploading any new files.You can upload one or many files at the same time. But, if you are uploading a lot of files at the same time, be aware this may take a while. It is optimal to do this in batches to ensure you don’t crash the website.It will state the maximum upload size which as a standard is 64MB on most sites that we create. Most images and documents shouldn’t ever be bigger than this. But if you have a special scenario and need your maximum upload size increased then please reach out to us.

Step 3 : Adding new files
You have two options when uploading new files to your website. You can drag files into the box or click the ‘Select Files’ button and search through the files on your computer.


